There is no question that this game was the most important and decisive game of the 2001 Grand Chess Cyber Championship. Wayne Schmittberger is the man you have to beat if you aspire to win this tournament. He has already been the champion twice winning the 1998 event by a considerable margin and playing some nice Grand Chess in the 1999 event as well. In winning these championships he only lost one game out of the nearly twenty played!
Of course desiring to defeat a champion and actually carrying are two different things. Wayne has considerable experience with Large Chess variants ranging from Grand Chess to Turkish Great Chess, not to mention the various versions of Shogi, which even in its basic 9x9 version is tough enough let alone tackling versions played on boards that can be as large as 25x25. He also has designed his own variants on our old workhorse, chess.
Unfortunately I can not say I overcame all this vast experience with brilliant play. I was rather lucky to win this, as my game was extremely shaky coming out of the opening. I was fortunate that in a tough situation, I noticed a decent tactical trap that was tempting enough for Wayne to test its validity.
2001 Grand Chess Cyber Championship Final
White Black
John Vehre Wayne Schmittberger
1. f3-f5 .....
1.c3-c5 or 1.g3-g5 may be more logical Grand Chess first moves. In Grand Chess you do not have the castling privilege, and playing chess at the head of your king, to borrow a concept from Shogi, may not be the best way of conducting the fight. Still after years of Orthochess it is hard not to touch those little guys in the center, sending them off to far fields to battle for truth, justice and one's rightful share of the center.
1. ..... f8-f6
2. Ni2-h4 Ni9-h7
3. g3-g4 g8-g7
4. Nb2-c4 Nb9-c7
5. d3-d4 d8-d7
6. e3-e5 Bc9-d8!
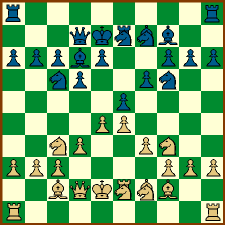
We have arrived at what probably is the basic opening position in Grand Chess. White has occupied the center and has used his d and g pawns both as supports for this center and as shields against possible “Randloper” harassers that might otherwise be tempted to emerge at a7 or j7 disrupting the harmony of white's big guys in the center.
Wayne decides on a good waiting move, whose point will become clearer after the next two notes. For white's part he has made all the obvious easy developing moves, and must now in turn decide on where he is going to put his king and rooks. Unfortunately the best squares are not that obvious or easy to choose at the moment and white in fact does not play in the most accurate fashion.
Black could have played this position in a number of different ways one of the more aggressive being 6...Bh9-d5 7.Bc2-e4 Bd5xe4 8.Cg2xe4 Nh7-g5 9.Ce4-d3 f6xe5 10.Bh2xe5 e8-e6 although 11.Be5-f4 leaves white perhaps more harmoniously placed.
Another big question is whether or not black can just continue copying white's moves. 6...e8-e6 might be the Four Knights variation of Grand Chess! White might try to punish black with 7.e5xf6 when natural recaptures seem to leave black with a slightly uncomfortable position after 7...Bc9xf6 8.f5xe6 Bh9xe6 9.Bh2-d6 Now black can choose:
1) 9...Bf6-e7 10.Mf2xf9+ Ke9xf9 11.Ra1-f1+ Kf9-e9 Black has to be careful if 11...Kf9-g10 his king's position may be too compromised after 12.Bc2xh7 i8xh7 13.Bd6xe7 Cg9xe7 14.Cg2-e4 or 12...Be7xd6 13.Rf1-f9 12.Bc2-g6 and at least optically white's position looks threatening although black should be able to defend this.
2) 9...Bf6-g5 This counterattack looks tempting but is a bit risky. After 10.Mf2xf9+ Ke9xf9 11.Ra1-f1+ Kf9-e9 it now looks like white can just take the Cardinal and get a good game with 12.Bd6xg9 Bg5xd2 13.Bc2xh7. The threat of 14.Rf1-f9+ allows white to emerge with a Cardinal and a Knight for the queen which would be a slight material advantage while remaining somewhat better developed.
It is impossible really to look into all the possibilities here this early in the opening although I hope the above variations illustrate some of the problems the two players were facing. If the opening theory of Grand Chess develops further this will no doubt be a position that will require future exploration.
7. Rj1-e1 .....
Grand Chess like Shogi requires that your king find its own way to safety. White obviously is telegraphing that he is going to put his king on the right flank. Here he did not have much choice as one of the points of Wayne's previous move was that white can not make a Castle on the left flank since 7.Ra1-e1 would lose a pawn to 7...Bh9xc4+ 8.b3xc4 Cg9xa3.
In Grand Chess openings one thing you quickly learn is that your a and j pawns are very vulnerable. This is a result of the fact that the bishop's normal diagonal and the knight's most natural developing square are both on the same diagonal!
7. ..... Ke9-d10
The other nice point of Wayne's last move was that it made a nice tidy place to put his king without either giving away the direction he wanted to go or committing a rook to a square where it may not be optimally placed. If I had understood the idea better at the time, I might have preferred 7.Bc2-d3 to the rook move I actually played!
8. Ke2-f1 f6xe5
9. Nc4xe5?! .....
Centralizing the Knight was the most natural way of playing, but as things transpire, it would have been better to have recaptured with the bishop. Later on the Knight must return to c4 to head for its natural outpost on d6.
9. ..... Kd10-c9
10. Re1-e2?

If one considers how the game eventually ends this would appear to be quite a brilliant prescient idea! However it really isn't a good move and just wastes time at this point. White just does not have any entry points for his doubled rooks and does not look likely to create any quickly. Building a castle with 10.Kf1-g1 followed by a later Bh2-g3 and Kg1-h2 would have been a safe approach and a better use of the time white has while black is himself preparing a safe haven for his king
10. ..... Kc9-b9
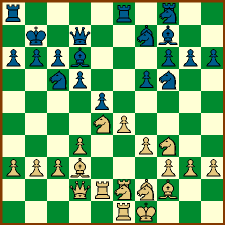
11. Kf1-g1 Rj10-f10
12. Bc2-d3 e8-e6
Black obviously is not eager to have an open b line against his king and refrains from taking the poisoned b pawn. In any case after 12...Bh9xb3 13 c3-c4 Bb3-a4 14.Qd2-a5 Ba4-c6 15. Ne5xc6 d7xc6 16.Cg2xc6 white wins his pawn back with a strong attack brewing.
13. Ra1-f1 Mf9-h10!?
This is an interesting idea, which puts even more pressure on white's center. Unfortunately it does have the drawback, which only becomes apparent later, of putting the Marshall out of play.
White's last move again offered a tainted pawn. If 13...Cg9xa3 then 14.b3-b4 and the Cardinal is trapped. If instead 13...d6xf5 then 14.Bd3xf5 when 14...Bh9xb3 still has its usual drawbacks which are compounded by the addition of the tactical idea of 15.Ne5xd7 c8xd7 16.Bf5xd7+. Wayne obviously saw through this idea and the move he played took away this transparent tactical shot.
14. Ne5-c4 Cg9-i10
Decentralizing another one of the big boys, but posing white the question of what is he going to do against the threat of ...e6xf5?
15. Nc4-d6 e6xf5
16. Bd3xf5 Bh9-d5
Black plays consistently for the counterattack and this move leads to a serious degradation of white's pawn structure. Greed again probably is not black's best option although it looks like black can more or less safely take the b pawn if he wanted it. After a forcing line like 16...Bh9xb3 17.c3-c4 Bb3xc4 18.Nd6xc4 Ci10xc4 19.Qd2-b4 Cc4-a6 Less good is 19...Cc4-g8 since 20.Rf1-c1 gives white nice pressure for his two pawns. 20.Qb4xh10 Rf10xh10 21.Bf5-d3 Ca6-b7 22.Bf5xh7 i9xh7 22.Mf2-f9 white's position looks more dangerous than it actually is. 17.Qd2-b2 is a better alternative for white as the tempting 17...Bb3-d5 leads to complications that do not look all that bad for white after 18.Nd6-e8 Nc7xe8 or 18...Bd5xg2 19.Ne8xc7+ Bc8xc7 20.Bh2xc7 b8-b7 21.Re1-e9 19.Qb2xb8+ Kb9-c10 20.Re2xe8 when the greedy 20...Bd5xg2 runs into 21.Re8xd8 and white has a winning attack.
Whether or not the morsel could be taken, I think Wayne's continuation was better as he is after bigger game than a measly pawn.
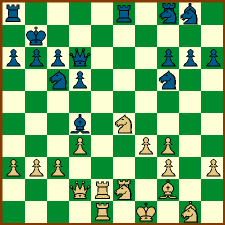
17. Cg2-i1 Bd8xh4
18. i3xh4 g7-g6?

Black wins a piece with this move, but subjects himself to a nasty attack. When we reached this position, I thought that 18...Bd5-e6 was a better way of conducting the attack. I had prepared 19.Rf1-e1 as a possible antidote intending to meet 19...g7-g6 with 20.Bf5xe6 Rf10xf2 21.Bd6xi10 Rf2xe2 22.Qd2xe2 Mh10xi10 23.Nd6-e8 and if black chooses to do mass liquidations after 23...Nc7xe8 24.Qe2xe8 Qd9xe8 25.Re1xe8 Ra10-e10 the tactical trick 26.Bh2xb8 Re10xe8 27.Ci1-c7+ Kb9-a10 28.Cc7xe8 leads to an endgame where white certainly does not stand worse.
19. Rf1-e1 g6xf5
20. Nd6xf5! .....
Not the easiest continuation to foresee, and perhaps Wayne only expected 20.Re2-e9 which would have led to a disaster for white after 20...f5xg4! 21.Re9xd9+ Nc7xd9 when white has the choice between a dismal material down situation after 22.Re1-e9 Rf10xf2 23.Re9xd9+ Kb9-c9 24.Qd2xf2 Kc10xd9 or since the Marshall really does not have a good move to subject himself to a mating attack after 22. Mf2-d1 neither is 22.Mf2-d3 Rf10-f3 or 22.Mf2-e2 Ra10-310 a particularly palatable choice g4xh3 (Q) 23.Ci1xh3 Mh10-g10+ winning the house.
Sacrificing the bishop keeps white's king's position closed and gives white sufficient time to organize his own counter attack.
20..... Qd9-d8
Suggesting defenses is becoming rather hard now, and black really needs to block the e file. 20...Nc7-e6 might be more tenacious than the game continuation. I had now intended on playing 21.c3-c4 when play might continue 21...Bd5-b7 22.d4-d5 Nh7-f8 23.d5xe6 d7xe6 Now the prosaic 24.Qd2xd9+ Nf8xd9 25.Re2xd6 nets white a clear pawn with continuing threats against b8 and penetration to the 9th rank with his rooks. 24.Re2xd6 is also interesting since the avaricious 24...Qd9xd2 25.Mf2xd2 Nf8xe6 26.Md2-d9+ Kb9-c10 27.Md9-e9+ Kc10-d10 28.Re1xe6 Ci10xe6 29.Me9xe6 yields a position where white still is much better coordinated and black's king still faces unpleasant threats.
21. Bh2xc7 Qd8xc7
Sadly, black must lose the queen in any case so giving her up now is better than delaying the agony with 21...b8xc7 22.Re2-e8 Qe8-e10 23.Ci1xc7+ Kb9-b10 24.Cc7-d8+ Qd10xd8 No fun either is 24...Kb10-a9 25.Qd2-f4+ 25.Re8xd8 etc. White also need not be in such a hurry to win his material back and can choose continuations like 24.Qd2-e3 or even 24.Rd8-e9 both which leave black in a quandary.
22. Re2-e9+ Kb9-c10
23. Ci1xc7 b8xc7
24. Qd2-f4 d7-d6
25. Qf4-e3 Mh10-g8
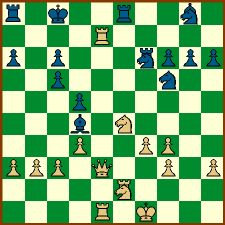
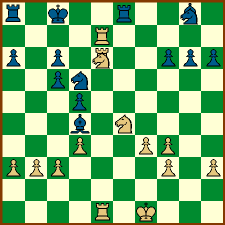
The only move, which meets the twin mating threats of 26.Qe8+ and 26.Qe7. Unfortunately the Marshall rather clumsily blocks his compadre on i10 who now can hardly in any way help the defense.
26. Mf2-e2!
This was my favorite moment in the game. I have now played a couple dozen grand chess games in competitions, but have not had a chance to quadruple my heavy pieces on a file before. It would have been hard to resist the opportunity to play such a move, if only to say I did it once. Fortunately at this point, not only was it picturesque, but probably also the prettiest continuation of the attack.
26..... Nh7-f6
Taking the bait was of course out of the question. If 26...Re1xf5 27 Qe3-e8+ Mg8xe8 28 Me2xe8 black has no way of stopping white's threatened mating pattern 29 Me8-c9+ Kc10-b10 30 Mc9-b9+ Kb10-c10 31 Re9-c9#. This variation is a nice illustration of the power of a Rook/Marshall tag team on the open 9th rank.
27. Qe3-e7 Nf6-d7
As in orthochess it is easy to make combinations when your opponent's pieces do no coordinate well. White's quadrupled pieces literally cut black's position in half. The sacrifice (or exchange) of a queen for a Marshall really is not a big deal and perhaps is just the equivalent of giving up a pawn. In any case this transaction is rather tainted and white would mate rather quickly after 27...Mg8xe7 28 Me2xe7 Bd5-b7 29 Me7-d9 Nf6-d7 30 Md9-d8+.
28. Qe7-e8+ Mg8xe8
The old grizzled veteran must finally give into her majesty's provocative advances! The king can not fend for himself any more and if 28...Kc10-b10 white quickly mates with 29. Qe8-d9 Nd7xe9 30 Me2xe9 Mg6xe9 31 Re1xe9.
29.Me2xe8 .....
29..... Black Resigns
Black rightly decides to throw in the towel. My main line had continued 29...Nd7xe9 or 29...Bd5-b7 leads to an already well known mating pattern with 30 Me8-d8+ Kc10-b10 31 Md8-d9+ and Re9-c9# 30 Me8xe9+ Kc10-b10 Going the other way offers no hope either. 30...Kc10-d10 31 Me9-b9+ Kc10-d10 32 Re1-e9 is the simplest win although 31 Me9-c8+ Kd10-d9 32 Nf5-e7+ Kd9-e10 33 Mc8-c9+ Ke10-d10 34 Mc9-b9+ Kd10-c10 35 Mb9-e9+ also seems to mate. 31 Me9-d9 Kb10-c10 32 Re1-e9 Ci10-f7 33 Md9-c9+ and white mates in one.
In the final position my notes indicate that I also considered the defense 29....Rf10-f8 30 Re9-e10+ Kc10-b9 31 Me8xc7+ Kb9-b8 32 Mc7-d9+ Kb8-a7 33 Md9-b9+ Ka7-a6 34 Re10xi10 reaching the conclusion that this is a simple win. 34..., Ra10xi10 loses to 35 Mb9-b4+ followed by taking on d5. No better is 34...Bd5xi10 when 35 Mb9-b4+ Ka6-a7 36 Nf5-e7 looks strong.